Installing the Trial Edition 
If you are not sure where to start with vulnerability management, a good way to get oriented is with the Trial Edition using a virtual appliance. Please see the instructions below.
Installing the Greenbone Enterprise TRIAL
The Greenbone Enterprise TRIAL is the free virtual version of the Greenbone Enterprise. It is available in OVA format for Oracle VirtualBox or VMware Player Workstation/Pro.
VMware Workstation Player/Pro
Requirements
Compatibility:
- VMware Workstation Pro 16 or higher
- VMware Workstation Player 16 or higher
- Minimum requirements: 2 CPUs, 5 GB RAM
- Virtual network adapter with a direct Internet connection
Importing the Greenbone Enterprise TRIAL
1. Download the OVA file of the Greenbone Enterprise TRIAL.
2. Download and install VMware Workstation Player or Workstation Pro for the operating system used.
3. Start Workstation Player/Workstation Pro.
4. In Workstation Player: Select Player > File > Open… in the menu bar or click Open a Virtual Machine in the Home area.
In Workstation Pro: Select File > Open … in the menu bar or click Open a Virtual Machine in the Home area.
5. Select the OVA file of the appliance in the file system.
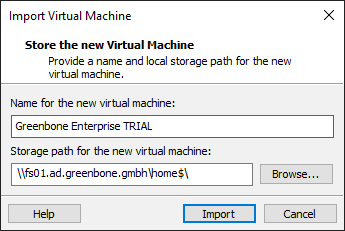
6. Click Import.
→ The appliance is being imported. This process can take up to 10 minutes.
When the appliance has been imported, it will appear in the left column in Workstation Player/Workstation Pro.
7. In Workstation Player: Select the appliance in the list and click Play virtual machine.
In Workstation Pro: Select the appliance in the list and click Power on this virtual machine.
Note:
Depending on the VMware version you are using, a message may appear asking if you
want to upgrade the virtual machine. In this case, select “Update”.
→ The GOS administration menu is opened and allows to proceed with the general system setup.
Oracle VirtualBox
Requirements
• Compatibility: Oracle VirtualBox 6.1 or higher
• Minimum requirements: 2 CPUs, 5 GB RAM
• Virtual network adapter with a direct Internet connection
Importing the Greenbone Enterprise TRIAL
1. Download the OVA file of the Greenbone Enterprise TRIAL.
2. Download and install Oracle VirtualBox for the operating system used.
3. Start VirtualBox.
4. Select File > Import Appliance … in the menu bar.
5. Click ![]() and select the OVA file of the appliance in the file system.
and select the OVA file of the appliance in the file system.
6. Click Next.
→ The appliance settings are displayed.

7. Check the configuration of the virtual machine, and, if necessary, change values by double-clicking in the input field of the corresponding value.
8. Click Import.
→ The appliance is being imported. This process can take up to 10 minutes.
When the appliance has been imported, it will appear in the left column in VirtualBox.
9. Select the appliance in the list and click Start.
→ If an error message is displayed, continue with step 10.
→ If no error message is displayed, the GOS administration menu is opened and allows to proceed with the general system setup.
10. Select the appliance in the list and click Settings.
11. Select Network > Adapter 1.
12. Choose the correct network adapter in the drop-down list Name.
13. Click OK.
14. Select the appliance in the list and click Start.
→ The GOS administration menu is opened and allows to proceed with the general system setup.
Performing a General System Setup
After we have installed the Greenbone Enterprise TRIAL as a virtual machine, we must perform a general system setup to use all functions.
After powering on the virtual machine, a login prompt is displayed in the console.
1. Log in using the following login information: User name: admin | Password: admin
→ When logging in for the first time, the GOS administration menu displays the First Setup Wizard to help with the basic configuration of GOS.
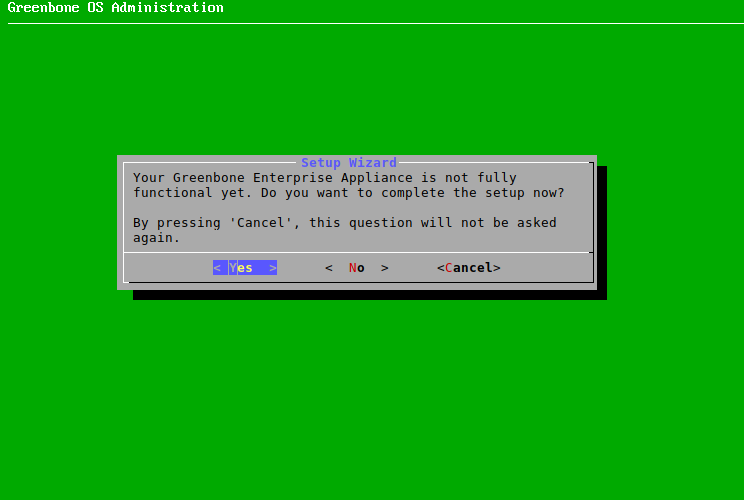
2. Select Yes and press and Enter to start the Wizard.
Note: The wizard can be closed by selecting No and pressing Enter. Steps that have not yet been completed will be displayed again at the next login. The wizard can also be closed by selecting Cancel and pressing Enter. In this case, however, incomplete steps will not be displayed again. Any step can be skipped by selecting Skip or No and pressing Enter. Skipped steps will be displayed again at the next login.
→ It is asked whether a web user should be created. This is required to use the web interface.
Note:
The first web administrator (web user) created is automatically the Feed Import Owner.
Scan configurations, compliance policies, report formats and port lists by Greenbone Networks (hereafter referred to as “objects”) are distributed via the feed.
These objects must be owned by a user, the Feed Import Owner. The objects are downloaded and updated during a feed update if a Feed Import Owner has been set.
Only the Feed Import Owner, a super administrator and users who obtained respective rights are able to delete objects. If objects are deleted, they will be downloaded again during the next feed update.
3. Select Yes and press Enter.
4. Enter the user name of the web administrator.
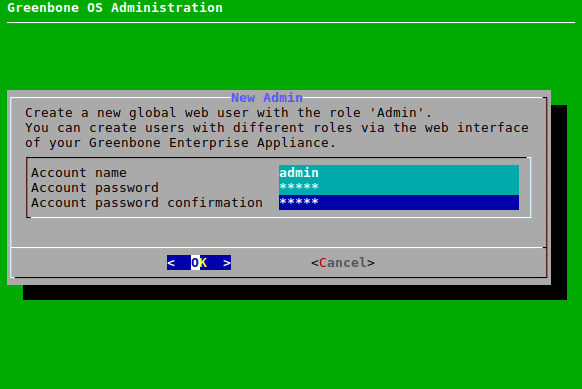
5. Enter the password of the web administrator twice.
6. Select OK and press Enter.
→ A message informs the user that the web administrator has been created.
7. Press Enter to close the message.
Note:
Since we want to use the free Greenbone Community Feed, we skip the next step.
8. Select Skip and press Enter.
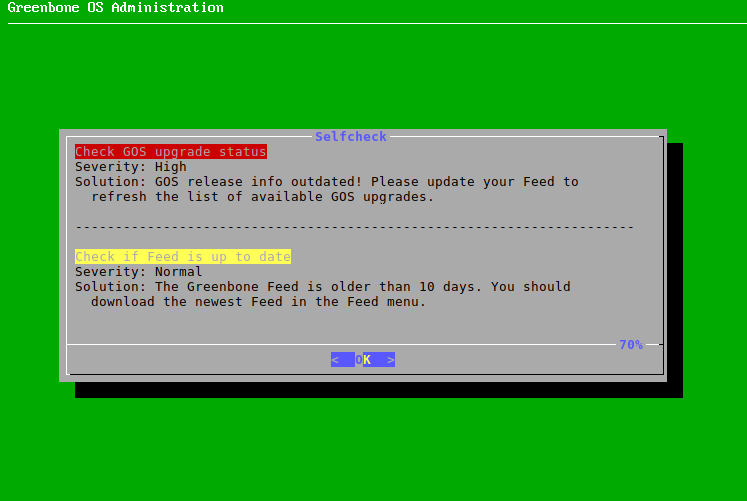
After the last step, a status check is performed. A message shows the result.
Note:
After closing the message by pressing Enter, the GOS administration menu can be used. If there are any incomplete or skipped steps, the First Setup Wizard will reappear at the next login.
Additional Notes
• It is recommended to change the password of the GOS administrator.
• The Greenbone Enterprise TRIAL uses a self-signed TLS certificate. When logging in to the web interface, this is considered insecure by the web browser and must therefore be added to the web browser as an exception.
• Shutting down or restarting the virtual machine should only be done via the menu option Maintenance > Power in the GOS administration menu to ensure that important system processes, such as the feed update, are not interrupted.
Changing the GOS Administration Password
We can change the password of the system administration. This is especially important during the first base configuration. The password can be changed as follows:
1. Select Setup and press Enter.
2. Select User and press Enter.
3. Select Password and press Enter.
4. Enter the current password and press Enter.

5. Enter the new password and press Enter.
Note: Trivial passwords are rejected. This includes the default password admin as well.
6. Repeat the new password and press Enter.
Note: The change is effective immediately and a commit of the change is not required. A rollback is not possible either.